A topical and self-interested comment on my life, revelations, and my path to discovery.
Showing posts with label recipe. Show all posts
Friday, March 1, 2013
Meal: Pork Chop, Mushroom, Bok Choy
Another whole meal that is both easy and cheap. Simple pork chop cooked in a little oil (coconut, or olive), removed from heat and allowed to cool for a minute, while other parts being cooked.
1. Cook pork chop to taste, sprinkled with salt and pepper. When done, remove, and set aside.
2. Add aromatics, garlic, and herbs. Add vegetables (mushrooms and bok choy). Cook for a short time, a few minutes (it doesn't take long), then add to pork plate.
3. If desired, fry an egg in oil, until desired texture. Place on top, and and serve.
Thursday, February 28, 2013
Meal: Chicken Stir-fry
Some ingredients are cheaper than others, but one thing I have been focusing on, is not on premium cuts, or expensive rare vegetables, but rather on making a meal; good, delicious, cheap, and fast.
A chicken stir-fry (or beef for that matter), is like a white canvas ready for some art. You can choose your vegetables, your aromatics, and your proteins, and typically ending with something that is just delicious.
Featured in this stir-fry: Garlic, Bacon, Scallions, Zucchini, Orange Sweet Peppers, Mushrooms, and a Chicken Breast
1. I like bacon. So, I start by cutting up bacon, and frying that (a wok works best for stir-frys, but use what you have!), and then removing the bacon, but using that fat to cut up chicken pieces.
2. Make sure you cook chicken until they are close to done (vegetables will cook much faster), and add your aromatics: garlic, scallions, onions.
3. Add your vegetables, I recommend at least 3 varieties, but more or less is often considered. Add your bacon back in after a minute, then add salt (or soy sauce), pepper, and any heat you might want (sriracha, cayanne pepper, jalepenos, etc).
4. Cook until vegetables start getting tender, and then serve hot. The entire dish costs under a few bucks for 3-4 helpings, and tastes great.
Wednesday, February 20, 2013
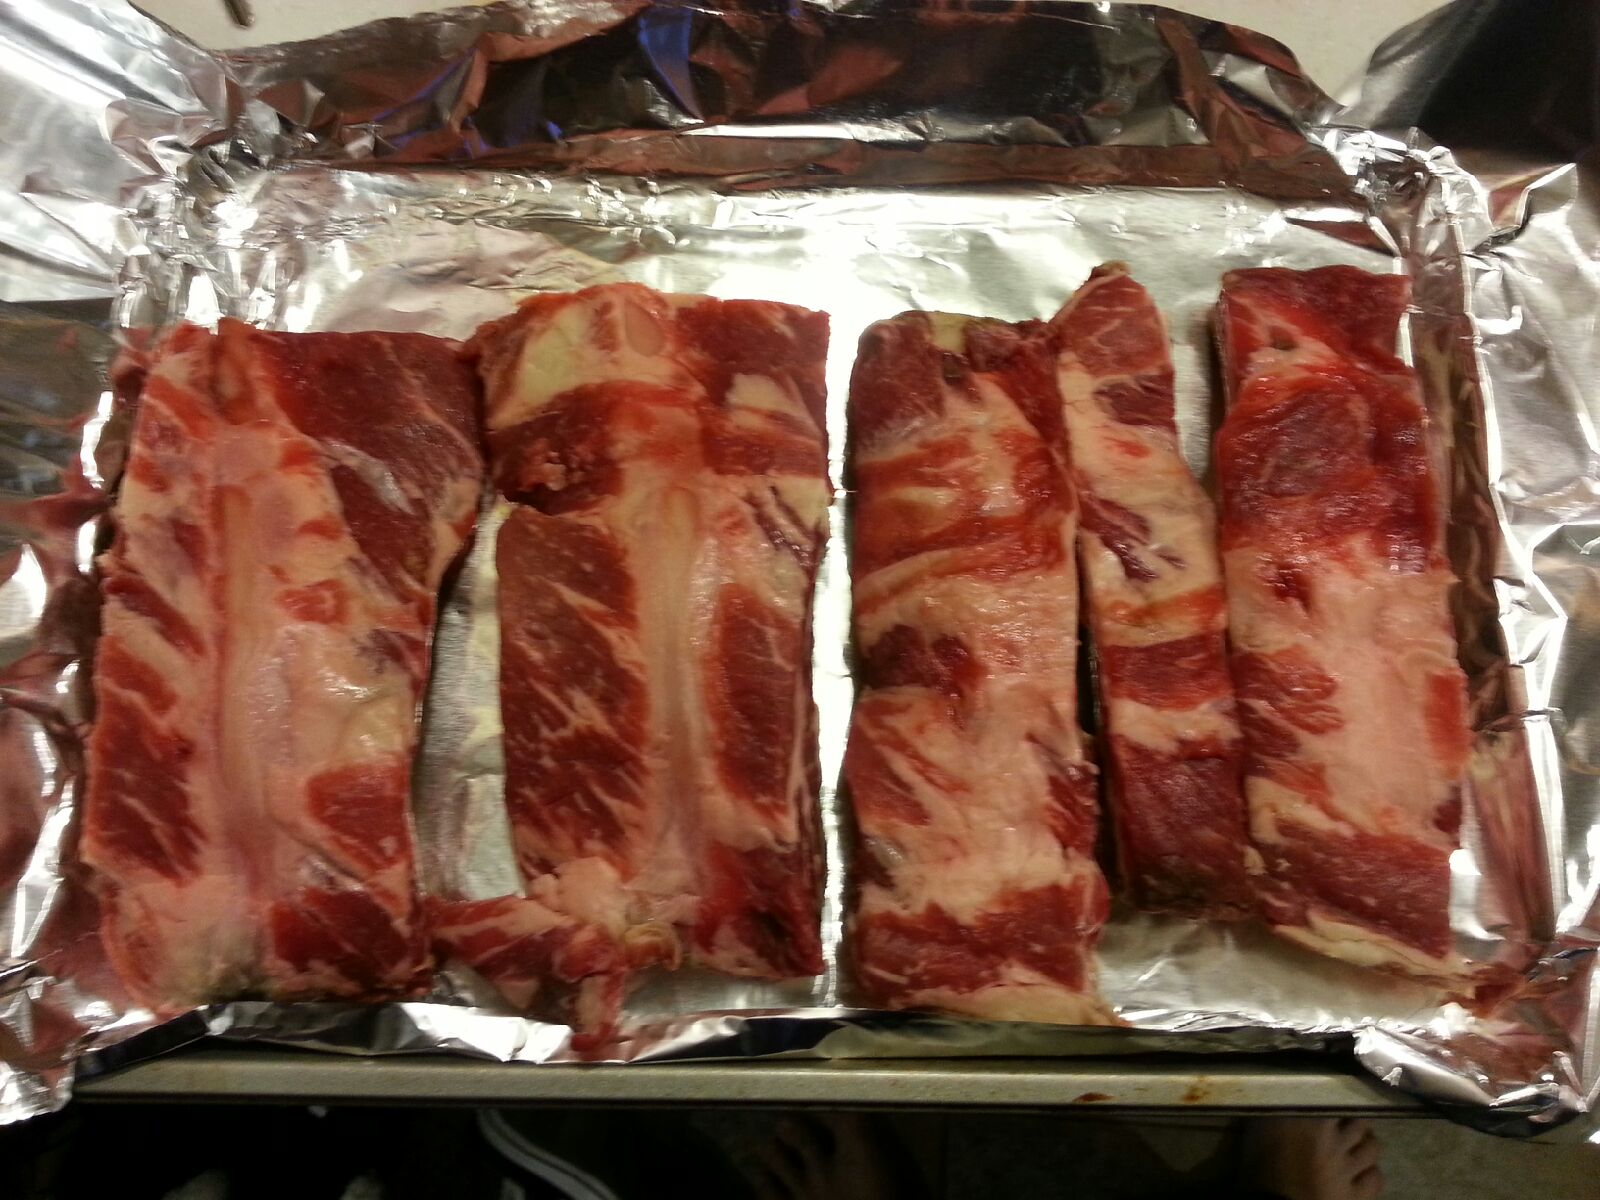
Recipe: Slow Baked Beef Ribs
Most rib recipes use a dry rub and/or a barbeque sauce. Rather than create a barbeque sauce right now, i decided to use a more basting technique to infuse some more fatty flavors.
Recipe:
Slow Baked Beef Ribs
4-6 Beef Ribs
1 tsp cumin
1 tsp pepper
1 tsp salt1 tsp paprika
1 tsp cayenne pepper
1 tsp garlic powder
1 tsp onion powder
3 Tbsp Bacon fat (or butter)
1 Tbsp soy sauce
1 Tbsp minced garlic
1. Combine dry ingredients together. Line baking pan with aluminum to wrap ribs after they have been spiced. Liberally use dry spice rub on the ribs, then fold aluminum foil around ribs to ensure they are completely covered.2. Set oven to 250 degrees, place in wrapped ribs and forget about them for 2 hours.
3. After two hours combine fat or butter, soy sauce and garlic. Spoon mixture over ribs.
4. Place ribs back in oven covered for another hour. After that, remove aluminum foil cover, re-spoon mixture over ribs, turn oven up to 350, and place back in oven for 15 minutes.
5. Ready to serve.
Monday, February 18, 2013
Recipe: Dark Chocolate Mousse Cake
Recipes seem to be getting popular, so updating how many are posted to three days a week. Hopefully everyone can find something they like. Today, is something a little different.
Recipe:
Dark Chocolate Mousse Cake
3 ounces chocolate (I used 82% Dark)
1 medium Haas Avocado
2 cups half/half, or light cream (You can use heavy cream for a heavier mousse, but it is a lot more calories)16 ounces cream cheese
4 eggs (exclude egg whites if you want the mousse to be more dense)
2 tsp kosher salt
1 tbsp vanilla extract
Sweetener if desired of your choice (Without a sweetener it isn't bad, but traditional mousse usually has sugar, so I would recommend some, to taste of course)
Optional Topping:
Fruit of choice (I chose an orange)
1 tsp ginger
1 tsp nutmeg1. Preheat oven to 250 degrees. Allow cream cheese to soften by leaving it out while preparing other ingredients.
2. Prepare avocado by removing seed and scooping out inside, whisk until all lumps are gone.
3. Melt chocolate, with your preferred method. (Microwave on low power, double boiler, or slow cooker).
4. Whip cream, adding vanilla, and sweetener, until it starts to thicken, (it will take longer with light cream).
5. Add avocado, cream cheese, eggs, chocolate, and salt to cream. Continue whipping for approximately five minutes.6. Pour in spring form pan, and place in water bath, in oven for 90 minutes. After 90 minutes, open oven, turn off heat and let sit for 30 minutes. Then place in refrigerator, for final cooling, at least 30 minutes.
7. Optional: Segment an orange, making sure to squeeze the orange into a bowl with the segments. Add nutmeg and ginger, stirring. Pour liquid over mousse, and decorate as desired.
Wednesday, February 13, 2013
Recipe Thursday: Chocolate Covered Bacon-Roses
Less of a recipe, and more of an attempt to do something different that others have started online. I wanted to take it a step further though, and you can't go too wrong with dark chocolate for valentine's day. A few hours early, but I wanted people to have the chance to replicate this if they felt like it.
Thursday Recipe:
Chocolate Covered Bacon Roses
The ingredient list is very short, and it actually only consists of two food items. Chocolate and Bacon, and both of those are the choice of the maker. I chose a 82% dark chocolate and regular bacon, though you can use thick bacon, darker, or more sweet chocolate. The process would still be the same.
1. Get the tools needed. There is several ways to do this, but the bacon needs a way to drain while cooking. You can get a pan like I did, or drill holes in a cheap pan, or possibly make some aluminum foil molds with holes to drain. I also used wooden skewers to make sure the bacon was clear in the center, to better facilitate staying on the stems.
2. Wrap the bacon around the skewers. To get the right look it might take some practice, but make sure you wrap more near the top, and have it taper down. To keep it together, I tied one end with butchers twine, to allow it to seem more flared when cooked. Important to make sure you don't wrap it too tightly, or too lose.
3. Let the Bacon cook. It took mine about 45-50 minutes at 350 degrees, before I was comfortable with how it looked. I removed from the oven, let cool for a few minutes then transferred to the refrigerator wrapped in paper towels to absorb extra grease.4. After cooled, i made sure that the wooden skewer ends were the right lengths, and the bacon was well cooked.
5. Use your preferred method for melting chocolate, (double boiler, slow cooker, low power microwave) until the chocolate is creamy. Once it is, dip and swirl the bacon in the chocolate until it is well covered. Place on a piece of parchment, or wax paper so it doesn't stick. Let cool for 10-15 minutes, before moving to a different spot on the paper (to avoid pooling) and then place in the refrigerator for chocolate to harden.
6. Disassemble flowers, keeping the important stems. (I got the flowers from Walmart for $3.00) Clean and wash before attaching cooled and chocolate covered flowers to your nice stems.
Tuesday, February 12, 2013
Tuesday Recipe: Orange Pecan Chicken
I love the flavor of pecans and walnuts, especially when roasted, or cooked with other foods. Another very simple recipe, without having to utilize a lot.
Chicken breasts, or thighs. Preference to taste/how many people you are feeding. This picture 2 large, and one small breast pieces.
Tuesday Recipe: Orange Pecan Chicken
Chicken
1/2 cup pecans
2 oranges
2 tbsp soy sauce
1 tbsp honey
2 tsp salt
2-3 tabs of butter
1. You can cut up the chicken into medallions, or leave whole, if you cut it up though, it will require half the time to cook. Turn oven to 350 degrees.
2. In stove top pan combine zest from oranges and then squeeze juice. Add rest of the ingredients and allow to warm over low heat and flavors to mix.
3. If chicken is in medallions, add to mixture, and then transfer to an oven safe dish. If not pour pecan/orange sauce mixture over chicken in an oven safe container. Place in oven and let cook for 10 minute windows. After 10 minutes, spoon liquid mixture and pecans onto chicken (or mix medallions up with sauce). Continue to do this for 30 minutes for medallions and small/medium breasts, or 40 minutes for larger breasts.
4. Options exist. You can add scallions, garlic for a more traditional "orange chicken" flavor, or pepper, sriracha for a spicier pepper flavor, or a little maple syrup/honey for a sweeter nutty flavor.
Thursday, February 7, 2013
Recipe Thursday: Crepe style Omelettes
I know, there are many ways to prepare eggs. People disagree on the best way, and probably always will. Today rather than a recipe, I have decided to share (what I started a few weeks ago), is a almost crepe style omelet.
There aren't many ingredients, in fact the list is almost wholly up to you. I recommend that you always cook something in the pan beforehand... something like bacon. :)
Thursday Recipe:
Crepe style Omelet
2 eggs per omelete
2-3 ounces of cheese per omelete
dash of kosher salt
dash of pepper
Any ingredients you feel you want to put in the omelet (Spinach, peppers, mushrooms, etc)
1. Make sure you have adequate pan lubrication. Coconut oil, or animal fats work best and impart the most flavor.
2. Whisk eggs, cut cheese (haha). Make sure pan is not smoking the oil, you never want to cook eggs on full temperature, instead cook at about 1/2 or less what your stove top can do. Use a large size pan so the eggs have space to spread out, and become thin.
3. Pour eggs into pan, and rotate at an angle until eggs fill all portions of the pan evenly.
4. When eggs are mostly cooked (Very fast, less than 2 minutes typically), then add your extras, including salt, pepper, and cheese to one half.
5. Lightly using a silicon spatula to lightly fold over the egg half that has no extra ingredients. Let cheese melt for 30 seconds.
6. Flip omelet, and remove from heat. Allow cheese to continue to melt for 30 seconds, and then serve.
Tuesday, February 5, 2013
Recipe Tuesday: Crustless Pumpkin Cheesecake
I have, an obsession with pumpkin. Everyone around me knows it, and when I suggest I came up with a new recipe, they ask if it has pumpkin in it. This weekend I tried a different type, but because I forgot eggs (no one is perfect), it came out, like something I didn't want. So, I instead will share my Pumpkin cheesecake recipe.
Tuesday Recipe:
Crustless Pumpkin Cheesecake
1 can (8 oz) of pumpkin puree (not pie filling, which is sweetened)
2 packages of cream cheese (8 oz each)
4-6 oz of Heavy cream (a little over 1/2 cup)
2 Tablespoons Pumpkin spice (amounts vary on your taste), or ground cloves, ginger, nutmeg, cinnamon, allspice (easier to just get pumpkin spice)
8 oz of sour cream ( about 1 cup)
4 eggs
1 Tablespoon of vanilla extract
1 Tablespoon Liquid Stevia or Sweetner of choice (Not much though, it doesn't need a lot)
Optional Topping:
Low Carb Dulce De Leche Glaze
2 cups Almond milk (unsweetened Vanilla)
1 cup Heavy cream
1 Tablespoon vanilla extract
1 Tablespoon Liquid Stevia
1. Preheat oven to 400 degrees.
2. Let cream cheese warm so it softens. When softened, mix pumpkin puree, cream cheese, and sour cream on a low setting (try to not whip the ingredients).
3. Separately combine eggs, heavy cream, sweetener, vanilla, and pumpkin spice.
4. Slowly add together, making sure to scrape sides so mixture is fully mixed. Again mix on low settings to avoid whipping the mixture.
5. Use butter/oil of choice and prepare a 9x3 spring form pan. When prepared pour mixture into the spring form pan, and nestle in a water bath (like a custard) before placing in the oven.
6. After 10 minutes lower temperature on oven to 250 degrees, and let bake for 45 minutes.
7. Remove from oven, place on counter for 30 minutes before placing in the refrigerator to cool for at least 2 hours.
Easy Optional Topping:
Do not start this part until the cheesecake has been cooling for at least an hour.
1. Combine all ingredients in a pan and heat on low heat until reduced to desired thickness. (This amount on low heat could/should take over an hour to reduce).
2. Pour on cheesecake after it has properly cooled, but while topping is still warm and malleable.
Thursday, January 31, 2013
Recipe Thursday: Coffee Rubbed Beef Brisket
One of the best things I have ever made, and amazingly perfect for special events, is a coffee and spiced rubbed beef brisket. It sometimes can be a little pricey, but the first bite you have will have you wanting more and more.
Thursday Recipe:
Coffee Rubbed Long Roasted Beef Brisket
Pick a beef brisket of your choice, size doesn't matter much unless you are trying to feed a larger crowd. Since we aren't grilling this, there is no sauce that will be needed, just your oven.
1 Tbsp Garlic
3 Tbsp Coffee grounds
1 Tbsp Kosher salt
1 Tbsp Black Pepper
2 Tsp Paprika
2 Tsp Onion powder
1 Beef brisket (7-15 lbs)
2 Tbsp Oil of choice (Olive, coconut, lard, bacon fat)
1. Mix the dry ingredients in a bowl, making sure there are no lumps.
2. Set the oven for 250 degrees.
3. Heat the oil in a pan that the brisket will fit in on the oven top. Once it is warmed up, cook brisket on all sides for 1 minute each. After each side has been seared remove from the pan, and let cool for 5 minutes.
4. Once the brisket has cooled enough to handle, generously pat the rub into all sides of the brisket making sure to cover it fully.
5. Place brisket in preferred roasting pan, and then place in oven.
6. Cook for approximately an hour per pound, and allow your home to fill with the delicious smell.
Tuesday, January 29, 2013
Recipe Tuesday: Parsnip, Herb and Sun-dried Tomato Salad
I experiment with new foods all the time. I will habitually buy something in the store that I have not tried before just for the chance to experience what it might be like. I made this recipe before and it was loved by it's audience. This recipe is more geared towards a Paleo recipe, but it can be modified very simply.
Tuesday Recipe:
Parsnip, Herb and Sun-dried Tomato Salad
4-6 medium sized parsnips
4-6 oz of sun-dried tomatoes (your brand of choice)
4-6 oz of feta cheese
8 oz of low-carb beef broth (your brand of choice)
2-3 tbsp Avocado or Extra Virgin Olive oil
Herb of choice (I used mint, but basil would probably be as good)
Pepper/Kosher Salt to taste
Optional: Pepperoni slices to add more protein to the mix
For my taste I found that using equal parts of ingredients allowed it to mix very well. (4 parsnips, 4 oz sun-dried tomatoes, 4 oz of feta cheese, but everyone's taste is different)
1. Peel parsnips much like a carrot or potato. Once complete cut into small 1/2"-1" squares. Place in a pot, with the broth, and let simmer for 10-15 minutes until parsnips start to become soft.
2. Dice sun-dried tomatoes and herbs adding as much as you would like for your taste, and then put in a bowl.
3. Once parsnips are done, remove, strain and let cool for 5 minutes, before adding them to the bowl with the sun-dried tomatoes.
4. If adding pepperoni, add now, and oil of choice, and then salt and pepper to taste.
5. Crumble feta cheese into mix, and fold with a mixing spoon, be sure not to stir, and crush the parsnips as they will be relatively soft.
Ready to serve. No additional baking, or cooking needed.
Thursday, January 24, 2013
Recipe Thursday: Bacon wrapped Jalapenos
Thursday Recipe:
Bacon wrapped Jalapenos Stuffed with Cream Cheese
1 lb of bacon, (approximately 10-12 slices of normal cut bacon)
10 Jalapenos
1 - 8 oz package of cream cheese
Kosher salt
Pepper
1 Cored pineapple, fresh (optional)
A nearly perfect snack.
1. Cut jalapenos in half lengthwise, making sure to clean out seeds and membranes. This will be plenty spicy for most people, and if you prefer more spice you can always add a little extra cayenne pepper.
2. Let cream cheese rest at room temperature, until it is softer. Placing it in a bowl, add a couple dashes of kosher salt and black pepper until it looks creamy.
3. If you plan on using the pineapple, cut into thin strips just shorter than the jalapenos and make sure they can fit inside.
4. Cut the bacon strips in 1/2 width-wise doubling how many strips you have.
5. Assembly: Place about a tablespoon of cream cheese inside the jalapeno and lay a slice of pineapple on top (pineapple is optional, and not recommend if you are in full keto). Then take a strip of bacon and wrap it around the jalapeno, pulling it a little tight, but be careful not to rip it. Once the bacon is wrapped around most of the jalapeno, place on a cooking sheet. Repeat the process for as much jalapenos and bacon that you have.
6. Place in oven at 350 degrees, and bake for 15-20 minutes until bacon is crispy.
Subscribe to:
Posts (Atom)